Custom Shower Doors
10 Common Mistakes Homeowners Make Installing Shower Doors
Small errors become expensive quickly. A shelf may need to be cut again. Custom glass may need replacement. A mirror can sit crooked because its mounting points were planned from an uneven ceiling. A bath accessory may pull loose because the fastener never reached solid backing.
These failures are rarely caused by one dramatic mistake. They usually come from several reasonable-looking decisions that do not work together.
The good news is simple. Most problems can be prevented through better measuring, suitable materials, and careful installation. Shelf sees these details as one connected system, not three separate tasks.
Why Finish Installations Are Less Forgiving Than They Look
Closet shelving, shower doors, mirrors, and bath accessories are installed near the end of a construction or remodeling project. By that point, finished surfaces are visible. Tile, paint, cabinetry, flooring, and trim may already be complete.There is little room for correction.
A misplaced hole in unfinished framing can be repaired easily. A misplaced hole in new porcelain tile is another matter. An undersized framing opening may be adjustable early in construction. Custom glass made for the wrong finished opening generally is not.
Three factors make these installations particularly demanding:
- Products must fit finished conditions. Framing dimensions are not the same as dimensions after drywall, tile, flooring, or trim.
- Loads must transfer safely. Shelves, glass hardware, mirrors, grab bars, and accessories need suitable anchors or structural backing.
- Alignment affects function. A product can be securely attached and still fail because it is not level, plumb, centered, or properly spaced.
Good work begins by separating visual references from reliable references. Ceilings, floors, countertops, tile lines, and adjacent cabinets may not be perfectly straight. Each surface should be checked rather than trusted.
Measurement Errors That Cause Fit and Clearance Problems
Measuring is not merely finding width and height. It means documenting the opening, surrounding surfaces, obstructions, clearances, and support conditions.Measuring before finishes are complete
An unfinished opening can change after tile, wall panels, flooring, baseboards, or decorative trim are installed. Even modest material buildup can affect whether a shower enclosure fits or whether a closet component clears a door casing.Final measurements should generally be based on final surfaces. For shower enclosures, that means measuring after the curb, tile, and wall finishes are installed. If an earlier measurement is needed for planning, label it as preliminary. Do not treat it as an order-ready dimension.
Taking one measurement instead of several
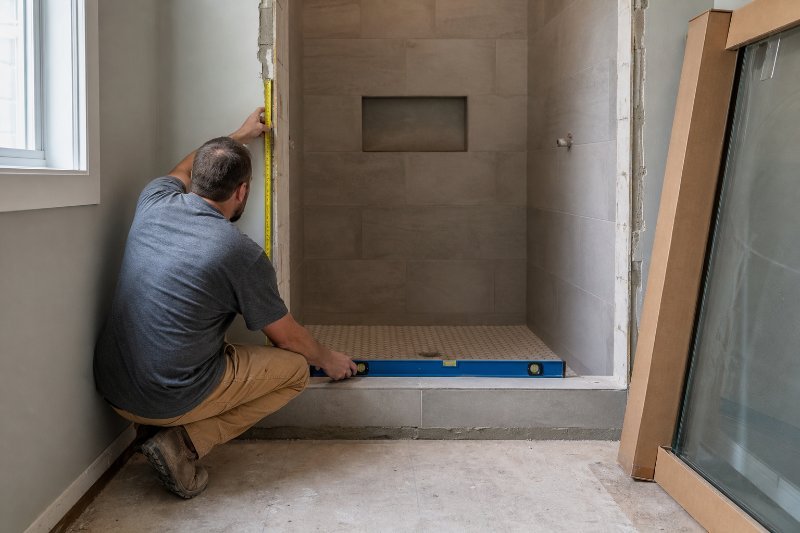
Walls are not always parallel. Floors and shower thresholds are not always level. Measuring an opening at only one point hides those variations.For an opening, check:
- Width near the top, middle, and bottom
- Height at more than one position
- Wall plumb on both sides
- Threshold or floor level
- Diagonal dimensions when squareness matters
- Depth available for tracks, brackets, or mounting plates
This is especially important with shower doors. According to guidance on
glass shower door installation errors , failing to verify level and plumb conditions can cause poor closing or water-leaking gaps.
Ignoring operating space
A product can fit the wall and still interfere with the room.A hinged shower door needs room to swing without striking a toilet, vanity, towel bar, or entrance door. Closet rods need enough depth for hangers. Drawers and pull-out baskets need clear travel. A mirror should not conflict with a faucet, medicine cabinet, outlet cover, light fixture, or backsplash.
Measure the product in both its closed and operating positions. Painter’s tape can help outline a mirror, shelving section, or accessory on the wall. For a swinging door, mark its projected path on the floor.
Overlooking model-specific requirements
Similar-looking products may require different clearances. Track height, hardware size, overlap, and adjustment ranges vary by model.For example, the
Kohler Fluence sliding shower door specification sheet states that its vertical opening should be at least 72 inches so the top track can be installed over the wall jambs. That requirement applies to the specified model, not every shower door. It illustrates why instructions must be checked before ordering or drilling.
Never assume that a replacement product uses the same holes, dimensions, or clearances as the old one.
Material Choices That Affect Durability and Safety
The cheapest component is not always the least expensive solution. Materials should match the load, moisture level, wall construction, maintenance needs, and intended use.Choosing shelving by appearance alone
A shelf for lightweight linens does not face the same demand as a long span holding books, storage bins, or densely packed clothing. Shelf thickness, span, bracket spacing, edge treatment, and substrate all influence performance.Common mistakes include:
- Using a long unsupported span
- Selecting shallow shelving for large storage containers
- Placing brackets where they interfere with hanging clothes
- Choosing a finish that is difficult to clean in the intended space
- Failing to account for concentrated weight from heavy objects
Treating every wall anchor as interchangeable
Drywall anchors have different load ratings and installation methods. Tile adds another layer of complexity. An anchor that works for a small robe hook may be inappropriate for loaded shelving or a glass door track.Whenever practical, mounting points should align with studs or installed blocking. Blocking is wood or another structural material placed behind the finished wall to provide a secure attachment point.
For shower door wall tracks,
Lowe’s shower door installation guidance specifically instructs installers to confirm that a support stud is behind the drywall before installing the wall track.
Wall construction should be identified before hardware is selected. A stud finder can help, but it may produce confusing readings near pipes, wiring, metal corner bead, or dense tile assemblies. Uncertainty is a reason to investigate, not a reason to drill.
Ordering glass or mirrors without planning the edges
Glass dimensions are only part of the order. Edge finish, thickness, hole locations, notches, hardware, and safety requirements can all matter.Tempered glass deserves particular caution. Once glass has been tempered, it cannot be trimmed or drilled like ordinary material. Hole and notch locations must be established before tempering. A measuring error may therefore require a newly fabricated panel rather than a field adjustment.
Mirror placement also affects material choices. Bathrooms introduce humidity and frequent cleaning. Edge exposure, mounting method, backing condition, and compatibility between adhesives and mirror coatings should be considered. Random construction adhesive is not a safe substitute for a product approved for mirror installation.
Installation Mistakes That Turn Good Products Into Bad Results
Correctly sized products can still fail during installation. Rushing is often the common thread.Drilling before confirming the entire layout
A single reference mark is not enough. Before drilling, place or dry-fit the complete assembly where possible. Confirm centerlines, bracket positions, door movement, reveal gaps, and alignment with nearby fixtures.For closet shelving, locate all standards and supports before fastening the first one. For a mirror, confirm both physical level and visual alignment. For bath accessories, check that towels can hang freely and that the accessory can be reached comfortably.
Use the actual mounting plate as a template when instructions permit. Do not copy hole spacing from packaging or estimate it by sight.
Using the wrong drilling technique
Tile can crack if it is drilled with excessive pressure, the wrong bit, or a hammer setting that is unsuitable for the material. Drill-bit selection should match the tile or wall surface. Plumbing and electrical routes must also be considered before penetrating a wall.Masking tape may help keep a bit from wandering on a smooth surface, but it does not replace accurate marking. Begin slowly. Keep the tool controlled. Stop if the material behaves unexpectedly.
Glass requires even greater care. Panels should be supported according to manufacturer guidance and kept away from hard contact at vulnerable edges. Improvised handling can damage the product or injure the installer.
Forcing components into an uneven opening
Tracks, channels, and brackets should not be pulled into alignment by over-tightening fasteners. That can distort parts, stress glass, or create visible gaps.Uneven conditions should be identified during measurement. Some systems include an adjustment range for minor irregularities. Others require different hardware, fillers, or correction of the underlying surface.
Fasteners should be tightened evenly and only as directed. More torque is not automatically safer.
Using sealant too soon or using the shower too early
Sealant surfaces must be clean and prepared as directed by the product manufacturer. Silicone applied over dust, moisture, residue, or failing old caulk may not bond properly.The bead also needs time to cure. Current shower-door guidance consistently warns against rushed sealing and early use. Follow the sealant label and enclosure instructions rather than guessing based on surface dryness. Silicone may feel dry on the outside before it has cured fully.
Water testing should happen only after the required cure period. During testing, inspect corners, track ends, seals, and the door’s closing edge. Do not assume every water issue requires more caulk. Poor slope, incorrect overlap, or misalignment may be the actual cause.
How Common Failures Play Out in Real Rooms
Practical examples show why isolated measurements are not enough.The closet shelf that technically fits
A homeowner measures wall-to-wall width and orders shelving. During installation, the shelf fits between the walls, but the closet door casing blocks one end from being maneuvered into position. The product dimension was correct. The installation path was not considered.A better plan checks both final placement and how the component will enter the space. Long shelves may need a different cut, removable support, or sectional layout.
The shower door with a widening gap
A hinged glass door is ordered using one width measurement. The tiled wall leans slightly outward. Once installed, the gap is narrow at the bottom and wider at the top. The latch alignment suffers, and the seal does not make consistent contact.Multiple width readings and a plumb check would have revealed the condition. That information could influence enclosure style, hardware selection, or whether the wall needs correction.
The towel bar that loosens after normal use
A towel bar is installed with light-duty anchors because it carries only towels. In practice, users grab it, lean against it, or pull downward while removing a towel. The real load is different from the assumed load.Accessory placement should account for normal human behavior, not just the object being stored. Secure backing and suitable fasteners matter even for simple fixtures.
The mirror that looks crooked while perfectly level
A mirror is installed using a level. Yet the nearby vanity and light fixture are slightly off-center, while the ceiling slopes. The mirror appears wrong because several visual lines compete.The installer should identify the strongest visual reference before mounting. Sometimes the best composition requires balancing true level, fixture centerlines, and consistent spacing. This decision should be made before adhesive or permanent anchors are applied.
A Practical Pre-Installation Check for Better Results
A reliable installation starts with a short pause. Before ordering materials or opening the drill case, work through these checks.Document the finished space
- Record multiple width and height measurements.
- Check walls for plumb and horizontal surfaces for level.
- Photograph obstructions, outlets, switches, trim, and plumbing.
- Mark stud or blocking locations when they can be verified.
- Note the wall finish and underlying construction.
- Confirm how large components will enter the room.
Match the product to actual use
Ask what the installation must hold, how often it will be used, and who will use it. Consider cleaning, reach, door movement, moisture, and future storage changes.Then review:
- Product dimensions and adjustment range
- Required support or blocking
- Manufacturer-specified fasteners
- Clearances for operation and installation
- Glass, finish, or edge options
- Sealant and cure requirements
- Warranty conditions related to installation
Stop at the right warning signs
Pause the project if measurements conflict, the wall condition is unknown, instructions do not match the supplied parts, or a mounting location may contain plumbing or wiring.Also pause if heavy glass cannot be handled safely, tile drilling feels uncertain, or the structure lacks proper support. Calling a qualified professional before damage occurs is usually easier than repairing finished surfaces afterward.
Precision Protects the Finished Room
Successful finish work depends on a chain of correct decisions. Measure after finishes are installed. Check more than one point. Verify level, plumb, support, operating clearance, and installation access. Select materials for the actual load and environment. Follow the instructions for the specific product rather than relying on habits from a similar job.The final appearance matters, but performance matters just as much. A shelf should remain stable. A shower door should move and seal correctly. A mirror should feel integrated with the room. Bath accessories should stay secure through everyday use.
When a wall, opening, or product choice raises questions, Shelf can review the room and intended use before small uncertainties become expensive corrections. For a free estimate tailored to the project, call or text Shelf at (845) 564-7400 and share a few details about the closet shelving, shower door, mirror, or bath accessory installation.
Disclaimer: The information provided in this article is for general informational and educational purposes only. Every home, space, and project is different, and product options, materials, measurements, installation requirements, pricing, and results may vary. For recommendations specific to your project, please consult with a Shelf design professional or another qualified professional.
Ready to start your project?
Get a free estimate on your custom closet, shower door, mirror, or glass work.
Get a free estimate →